
Each menu can contain sections, items and modifiers. You can add context to your menus through adding optional details.
This includes- Section and item level images
-
Restricted ordering hours for a section (e.g Sunday Lunch)
-
Section and item level descriptions
-
Item level allergen labels
Modifiers allow you to up-sell, cross-sell or to qualify an order.
-
To up-sell: give an item more than one size
-
To cross-sell: add an optional modifier with suggestions of suitable additions e.g. fries with a burger
-
To qualify: add an optional or mandatory modifier to ask for information such as what sauce they would like to add, or if they would like salt or vinegar with their fish and chips
Each menu can contain multiple sections, which in turn can contain either items or subsections.
Nested sections provide a convenient way to further organize your menu and make it easier for customers to navigate. With nested sections, you can create subcategories within a main section. For example, if you have a "Mains" section, you can create sub-sections like "Vegetarian Mains" and "Meat Mains" to further categorize your items.
To enable nested sections, simply contact our support team and they will assist you in setting it up. Once enabled, you can easily create and manage sub-sections within your menus. This feature allows for even more flexibility in designing your menu structure and enhancing the overall customer experience.
Menu structure
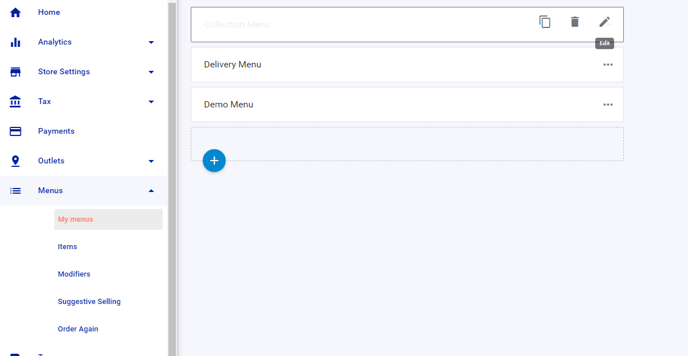
A store can have multiple menus - for example, you might want a “Delivery” menu that’s different from your “Collection” menu. Which menu is used for which service can be configured through our Outlet settings - see this article for instructions.
Menus are composed of various sections such as 'Starters', 'Mains', and 'Pizzas', each of which can contain sub-sections or individual items. To control the availability of items, sections can be assigned "Restricted Ordering Hours". For example, you can limit the availability of breakfast items to the morning hours.
Including images for sections and items is a great way to enhance your menu and give customers a visual representation of your products, ultimately increasing sales.
Edit your sections by hovering over the three dots on and clicking edit. Here you’ll find the description, images and restricted ordering hours.
Items are the main components of a menu. An item can come in multiple sizes (each one with its own name and price), it can be assigned tax rates, allergen labels, lead times, display images and more.
Modifiers are used to add more information to an item and to upsell. For example, a “Steak” item could have the type of steak (“Sirloin”, “Rump” etc) as a modifier.
-
Modifiers can be assigned prices to make them behave like supplements or up-sells
-
Modifiers can be assigned to sections, items, specific item sizes or even other modifiers
-
Multiple different modifiers can be assigned to an item, but only one copy of a single modifier can be assigned to an item.
Create an Item

-
On the left hand toolbar, select 'Menus'
- Click 'My menus'
- Click on the menu you'd like to add the item to, then subsequently, the relevant section. If you need to create a menu section, click the blue circle with the '+' (Add Section) and create your menu section
- Within the relevant menu section, click the blue circle with the '+' (Add Item)
-
Click 'Create new item'
-
Input details about your new menu item and click Done when you are finished to save it. Each item needs an Item name and display name - the latter is what the customer will see. You can add an image or labels (allergen/spice level) or any individual settings for this one item in the tabs following on from basics
Set up modifiers
-
Go to the QikServe Dashboard QikServe
-
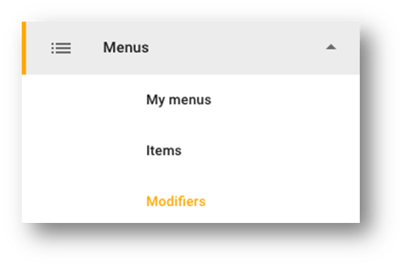
Select 'Menus' and then 'Modifiers'
-
Click the blue circle with the '+' inside it
-
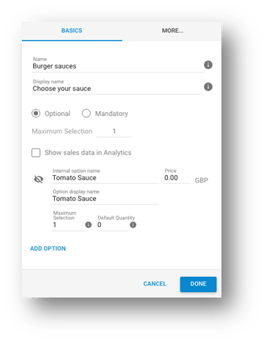
The display name is how the modifier will show to your customers. For example, 'Choose your sauce'
-
Select whether the modifier will be optional or mandatory. Mandatory modifiers will display first, followed by any optional modifiers if there are more than one modifier added to an item
-
The maximum selection decides how many options the customer can select per item
-
You can include the modifier items in your stock taking data allowing you to see which was the most popular over the course of a time period. If you are interested in this, tick the box to ‘Show sales data in analytics’, and then view the information in your Analytics at a later date
-
Enter your first modifier option into the box and give it a price. For example, 'tomato sauce'
-
To add multiple options, click on 'Add option', enter a name and give it a price
-
-
Click 'Done' to save
-
You can also set up Pre-select Modifier Options
Add a modifier to a menu section or specific items
-
To add a modifier to an item, click on 'Menus' and then 'My menus'
-
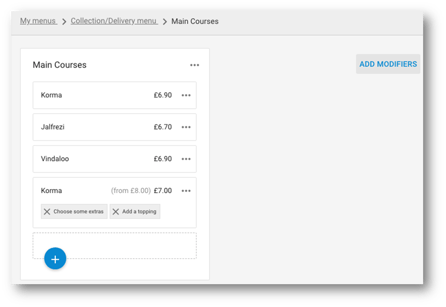
Click on a menu and subsequent section that you want to add a modifier to
-
Click on 'Add Modifiers' on the right hand side
-
Find the modifier you would like to add, then drag and drop the modifier with your mouse on to the item you want it added to. You can also add it to a menu section from here, so that all items in the menu section will have the modifier applied

-
Click 'Done' to close the modifiers pop up window
Tips & Tricks
Using modifiers is a simple and effective way to set up "bundle" type promotions, such as offering 3 items for £10. To create this type of promotion, start by creating a new item in your menu with the total value of the promotion, in this case, £10. Then, add the various options available as modifiers to the item.
For example, let's say you have a menu section called "Combo Deals." You can create a new item called "3 for £10 Combo" and set its price as £10. Then, add the individual items that customers can choose from as modifiers. These can be items like burgers, fries, and drinks. Each modifier option can have its own price, or you can include it in the total price of the combo.
By using modifiers in this way, you can easily create and manage bundle promotions, making it more convenient for customers to order multiple items at a discounted price. This type of promotion not only encourages customers to try different items from your menu but also increases sales and customer satisfaction.
Remember to promote your bundle deals on your menu and highlight the savings customers can enjoy. This will help attract more customers and generate more interest in your offerings. With the flexibility of modifiers, you can create a variety of bundle promotions to cater to different customer preferences and increase the overall value of their orders.
Take advantage of modifiers to set up bundle promotions effortlessly and watch as your sales soar.
More information about that can be found on our Promotions page.